Endgames and pawn play
Pawns decide more games than anything else on the board, and the ending is where that shows. Structures, the opposition, the crooked path, queening races and the many ways a game is drawn.
Pawns are the soul of chess
“… to play the pawns well; they are the soul of chess …”
— François-André Danican Philidor
Pawns define the shape of the game. Once moved they cannot go back, so every pawn move is a commitment — and a commitment you cannot take back is worth thinking about before you make it.
They are foot soldiers that never retreat. A pawn moves forwards, or diagonally to capture; on its first move it may go one square or two, and only one square at a time after that.
Pawn structures
These are the shapes worth recognising.
The pawn chain
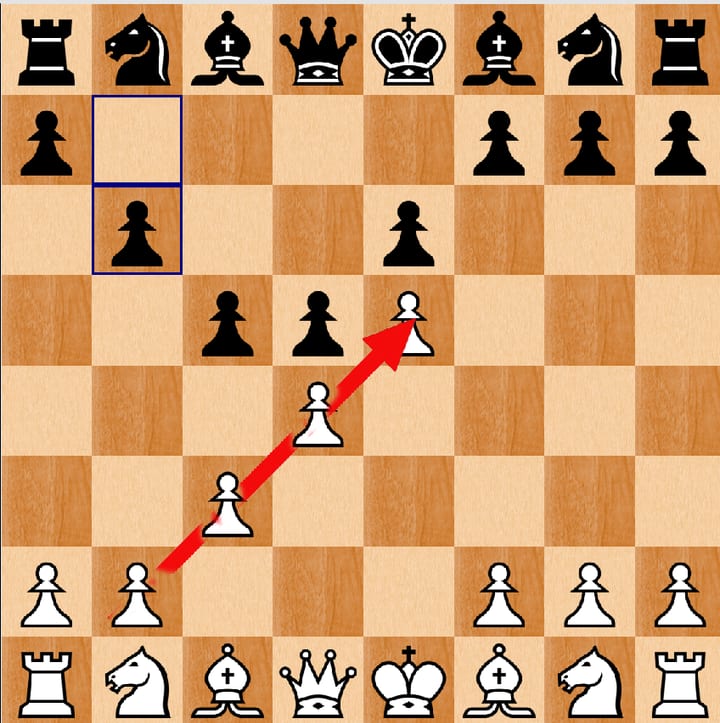
A diagonal line of pawns, each one defending the one in front. Attack the base — that is the pawn nothing else is protecting.
The isolated pawn
A pawn with no friendly pawns on either side of it. It cannot be defended by another pawn, so it has to be defended by a piece — which ties that piece down. Weak, but it can offer active play in return.
Doubled pawns
Two of your pawns on the same file. Often a weakness, though they do control useful squares. If you are going to accept doubled pawns, try to get something for them.
The backward pawn
A pawn left behind its neighbours that cannot safely advance. It matters more than it looks: it is a structural weakness that can be attacked, and only a piece can defend it.
Passed pawns
A passed pawn is one with no enemy pawn in front of it or on either side to stop it reaching the eighth rank. They are very powerful in endgames, because sooner or later something has to be given up to stop them.
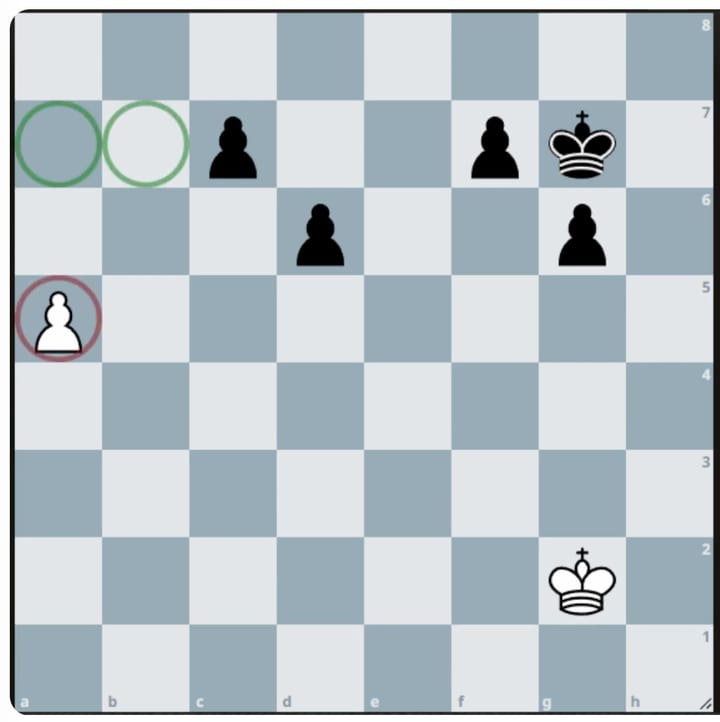
Playing with pawns
A few things to bear in mind once the game is under way.
Take the centre if you are allowed to. Pawns on d4 and e4 control the middle of the board, and they let the bishops out to run riot.
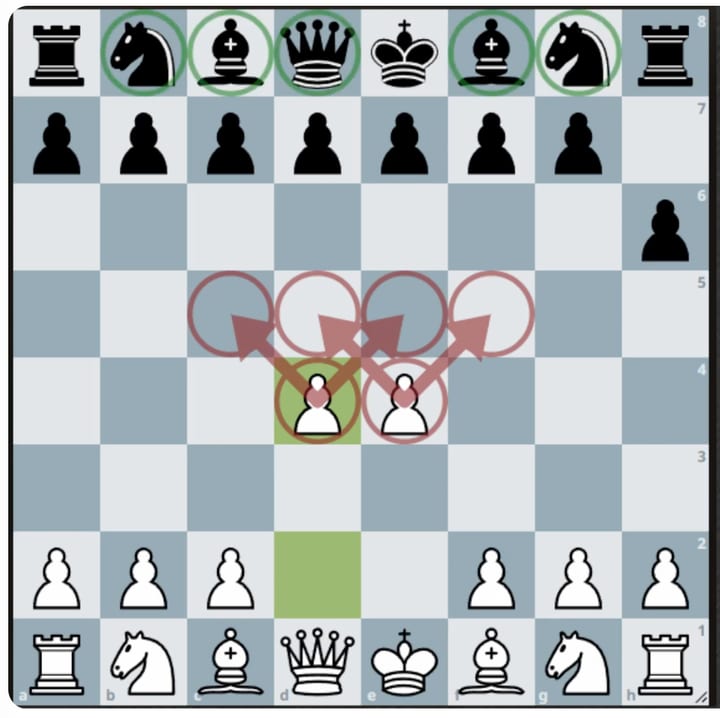
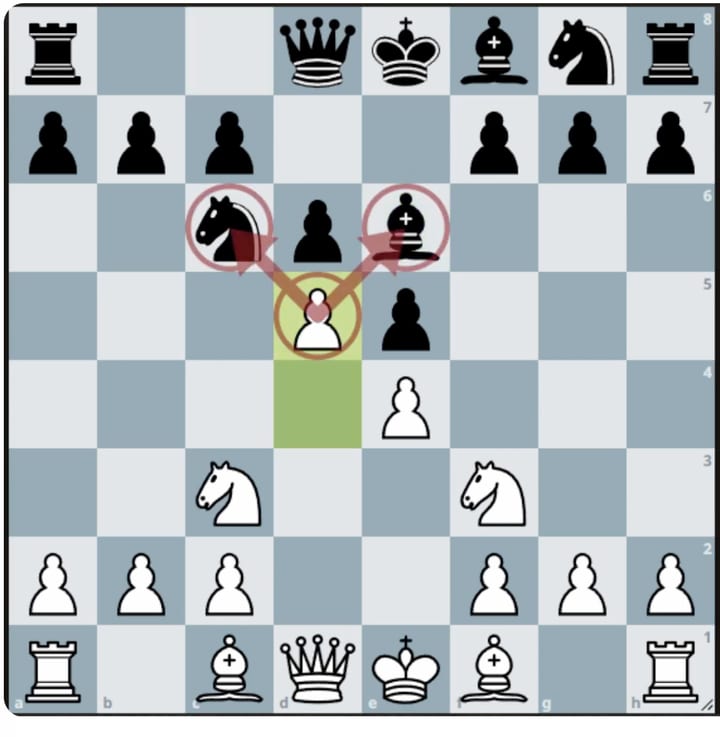
Watch for pawn forks. A pawn can fork just like any other piece, and win material doing it. Keep an eye on where your opponent’s pieces are standing.
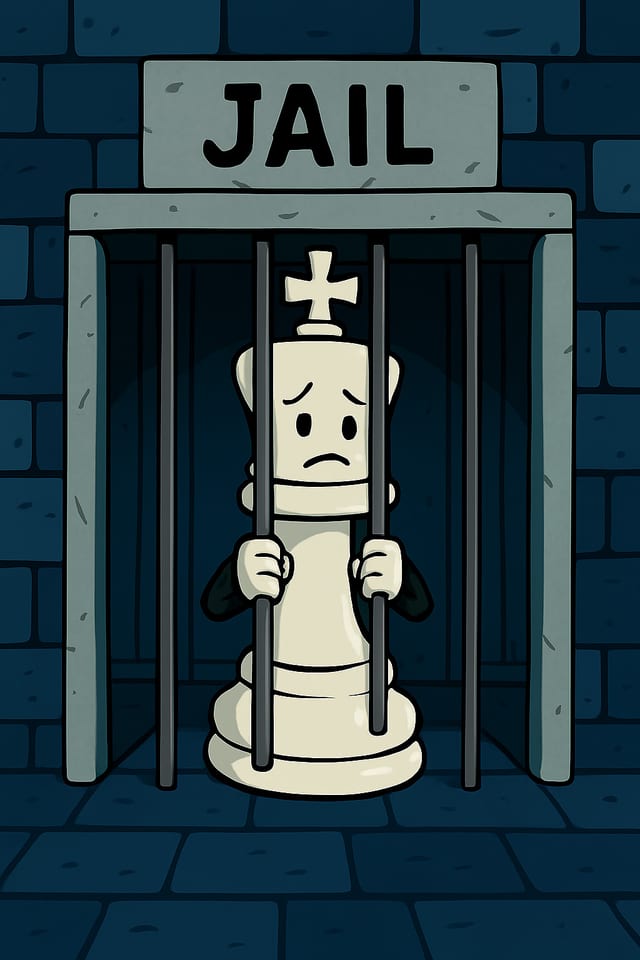
Once you have castled, keep the pawns near the king. They shield it from attack. Every one of them that moves forward creates a weakness in the king’s defence — and in fact any pawn move anywhere creates a weakness somewhere. Think of it as a jail cell for the king: cramped, but safe.
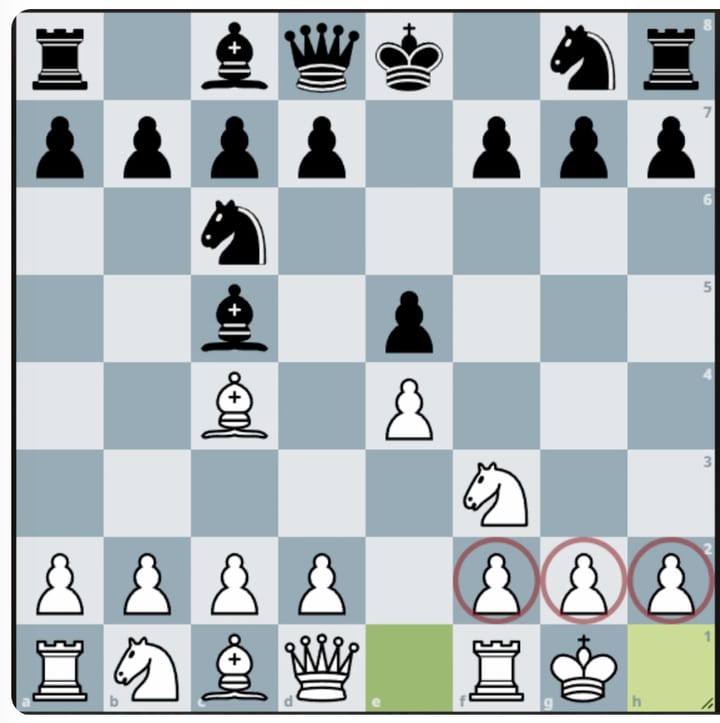
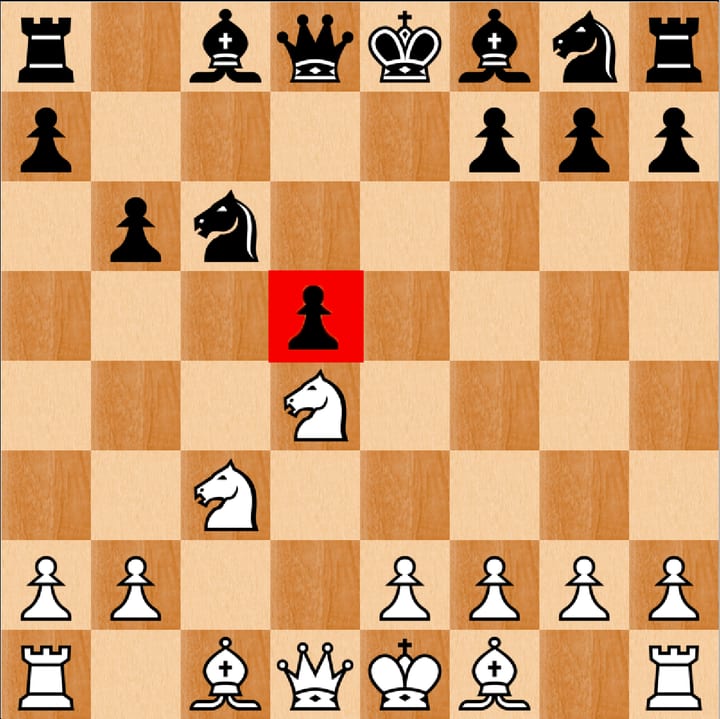
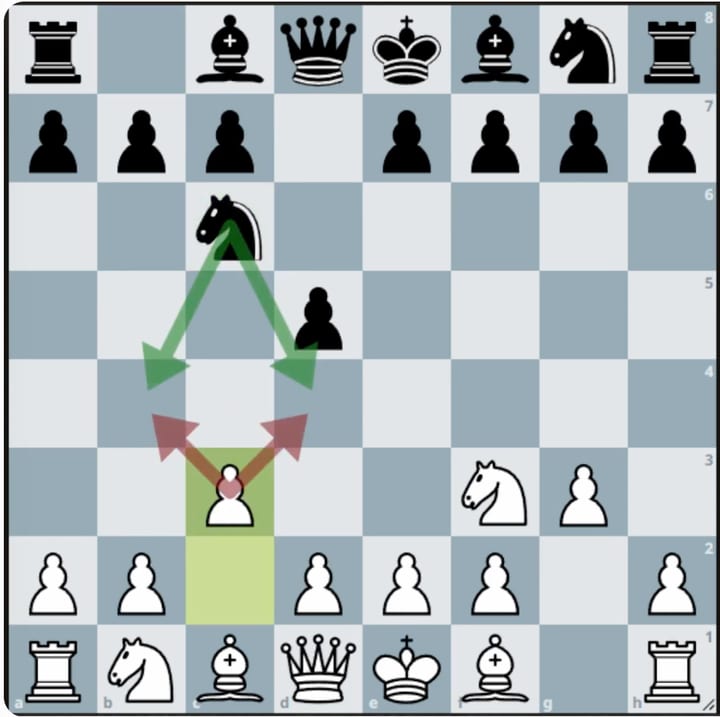
Use pawns to take squares away from a knight. A single move to c3 here stops the knight coming to b4 or d4 at all.
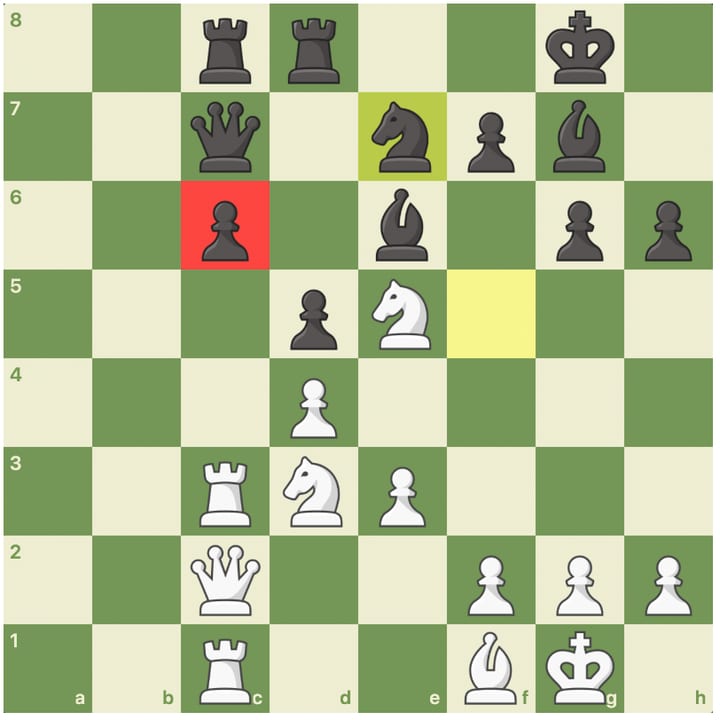
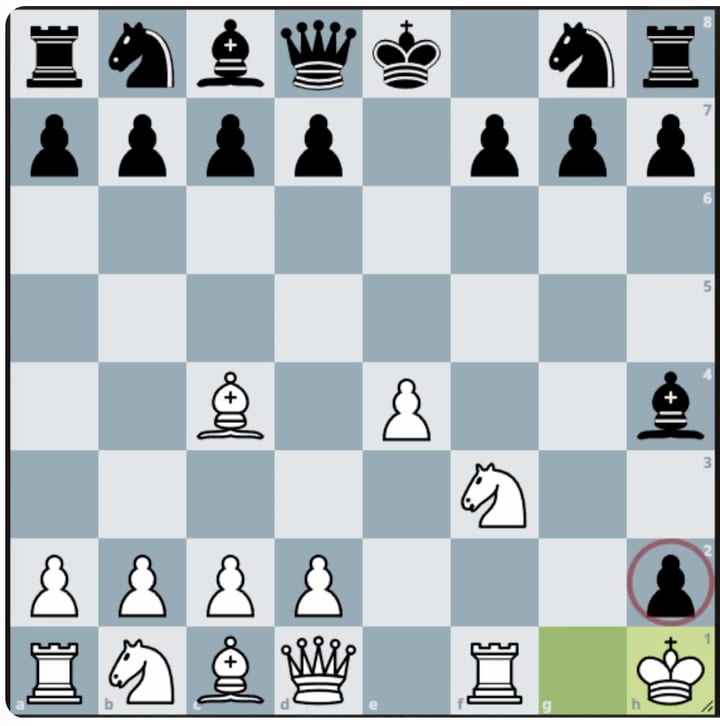
Keep your pawns connected. In this position White has isolated pawns on h2 and f3, which are easy to attack, and doubled pawns on the c file, which is also bad. Black’s structure is much healthier.
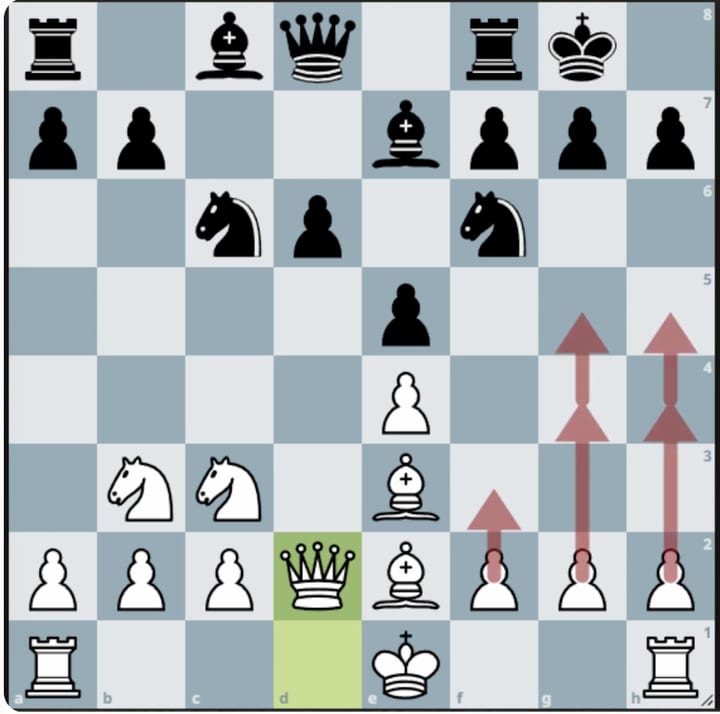
If your opponent has castled and you have not, consider a pawn storm. Advance the pawns towards their king and break the defence open. Here White is ready to follow up with rooks on the h file, and bishops and queen all supporting the running foot soldiers.
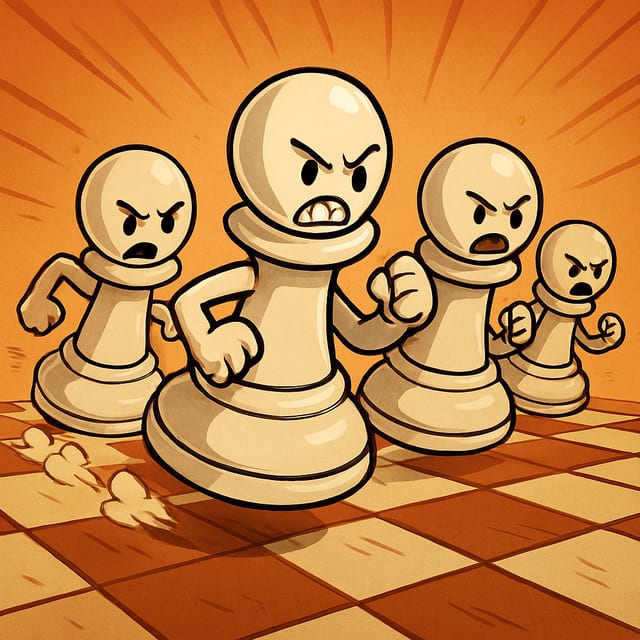
A pawn on the seventh rank does not always have to be taken. It can be better to sit in front of it — after all, Black cannot capture his own pawn. If the white king took it in this position he would be exposed to a quick attack from the black queen and bishop working together.
The minority attack
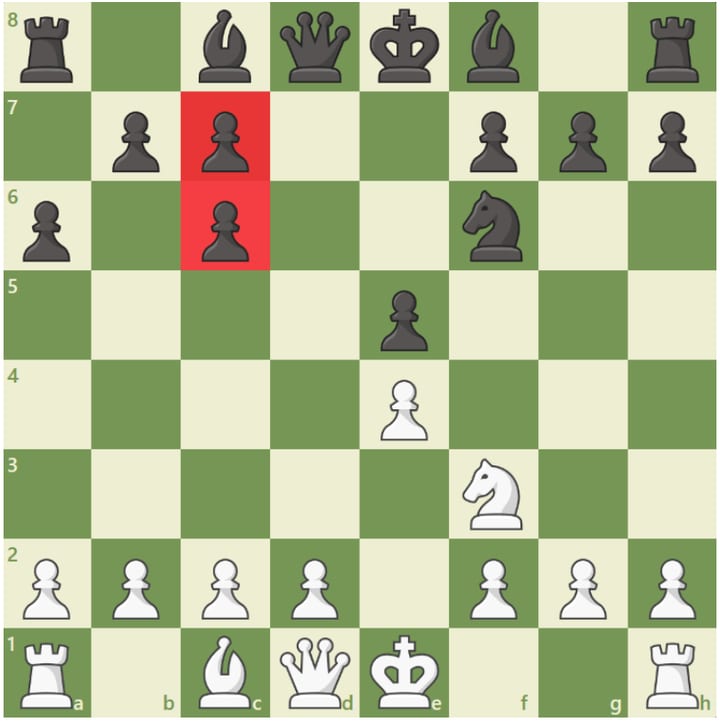
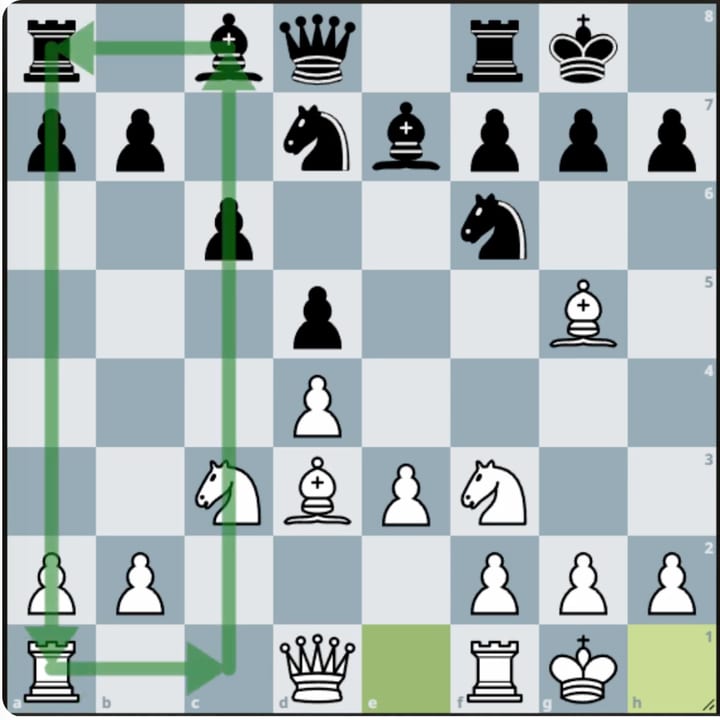
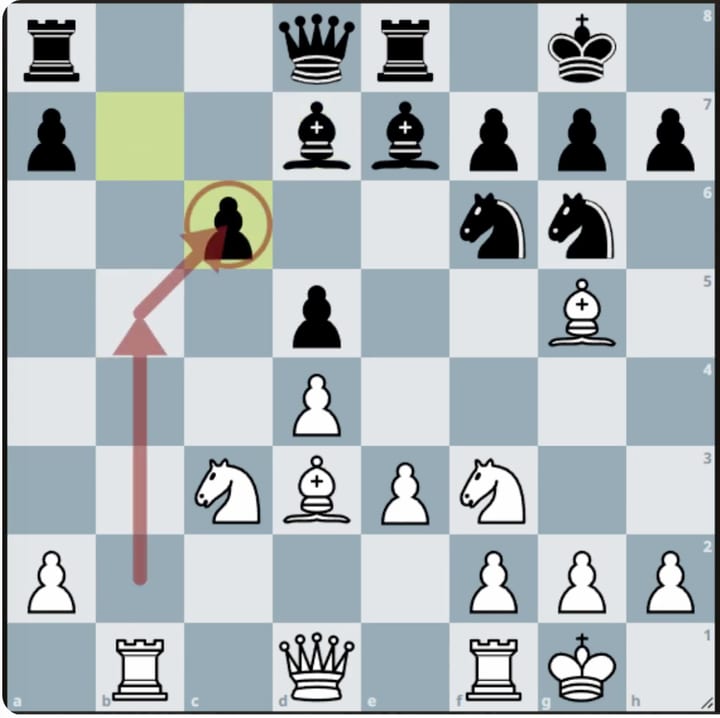
When your opponent has more pawns than you on one side of the board, you can start what is called a minority attack. In the first picture below there are two white pawns against three black ones.
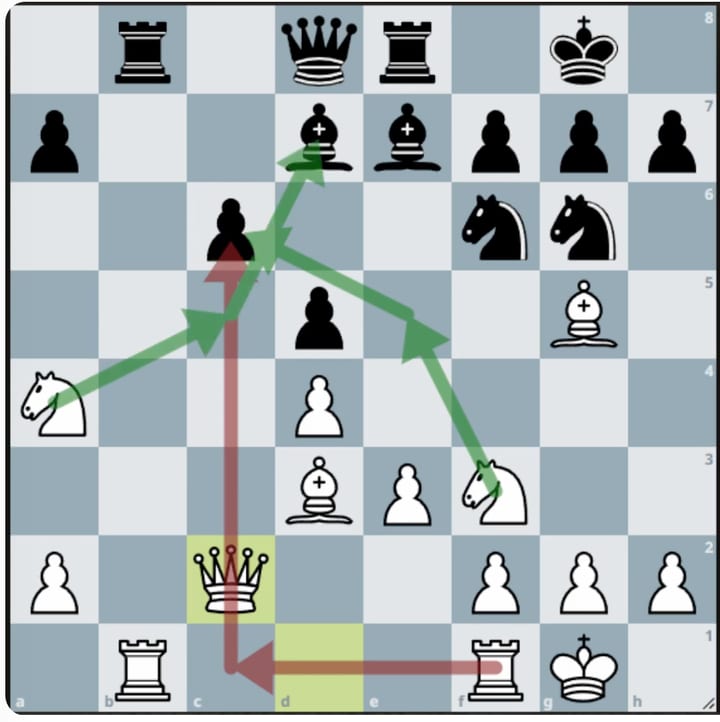
To break it up — in this simple example, and if Black allows it — advance the b pawn, sometimes with the a pawn alongside it, and take on c6. Black takes back, as in the second picture. That recaptured pawn is now a backward pawn: weak, because only a piece and not a pawn can defend it. It can then be attacked, as in the third.
The en passant trick
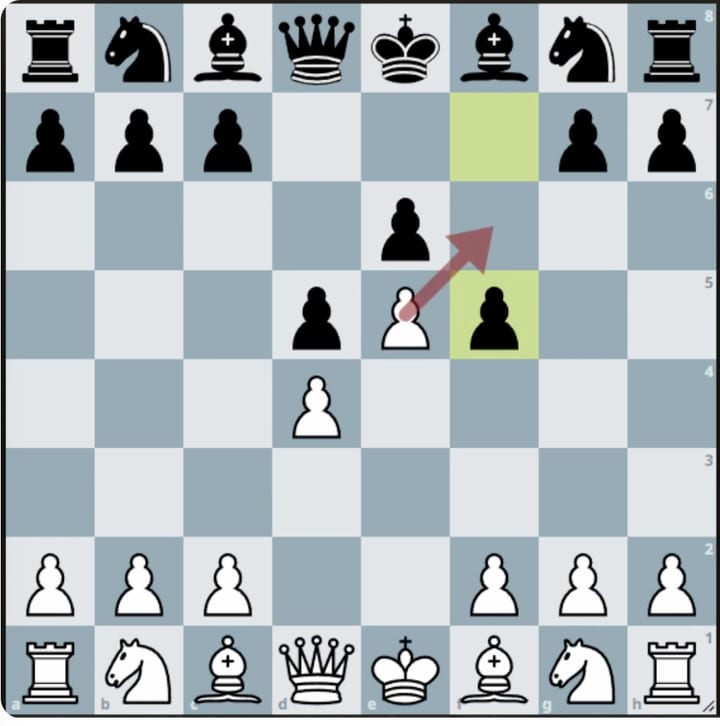
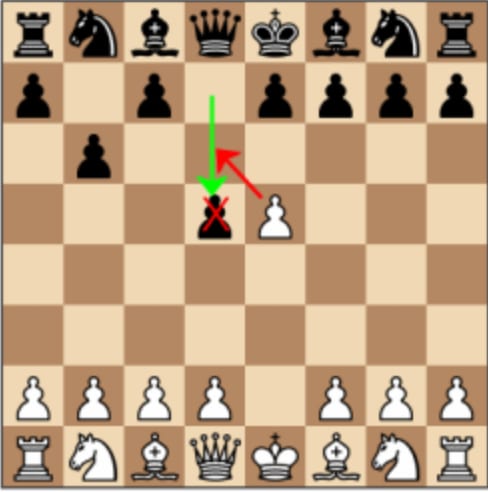
If you have a pawn on your fifth rank and your opponent moves a pawn two squares so that it lands beside yours, you may capture it as though it had only moved one. You do not have to — but if you are going to, it has to be on your very next move, or the chance is gone.
There is a fuller explanation, with boards you can play through, on Getting started.
Knight against bishop
They are each worth about three pawns, but they are not the same piece at all. Here are some of the pros and cons to think about.
| Knight | Bishop |
|---|---|
| Good in the opening and middle game | Good in the endgame when there are fewer pieces on the board |
| Slow movements, needs to stop for hay! | Fast on open diagonals, but needs space and can get blocked in |
| Jumps over pieces, best in the middle of the board | A bishop pair is better in the endgame |
| Difficult to predict its movements | Easy to see where it can go |
| Super tricky with forks | Can help to create a battery with the queen |
| Not easy to stop advancing pawns | Can block a queening pawn |
| Can combine nicely with a rook or queen in a checkmate | Opposite-coloured bishops can be draw-ish |
| Cannot be used as the checking piece in a discovered check | Can be used in a discovered check, and in windmill tactics |
| Covers all the squares | Covers only half the squares |
| Can’t create a battery | Only trade a bishop for a knight if it is to your advantage |
| Can get trapped or blocked by a bishop | Put your pieces on the opposite colour to your own bishop |
| Trade for a bishop if your opponent’s bishop looks strong | If your opponent has only one bishop, try to put your remaining pieces on the other colour |
The opposition
Opposition is when one king moves directly in front of the other, forcing the opposing king to move to the side or backwards. It is how you make progress in a king-and-pawn ending, and it is the difference between winning and drawing far more often than anything clever.
By taking the opposition you force the other king to give way, which lets your pawn advance and eventually promote. ⚠️ You must never let the pawn get in front of or alongside your own king, or Black can force a draw.
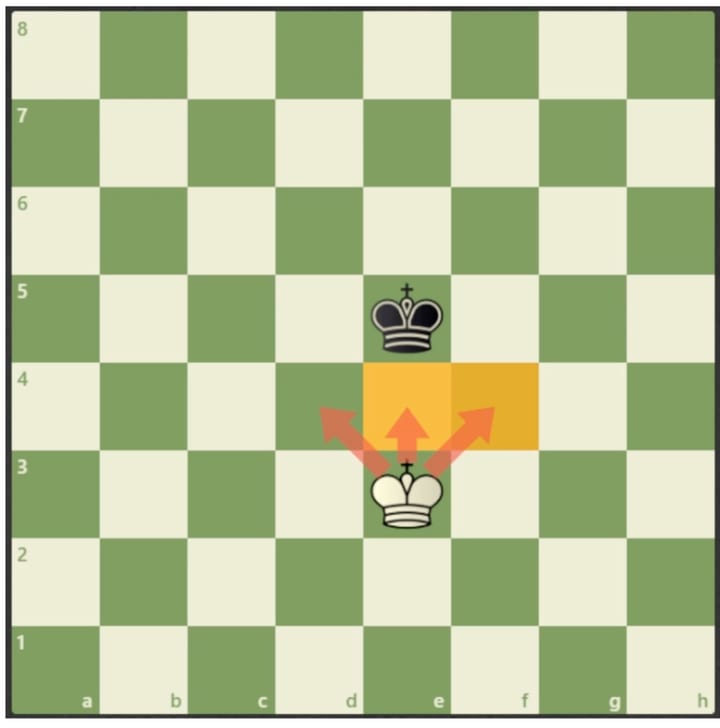
White to play
If it is your move and your king is directly in front of your opponent’s, they have to move aside or back, and you can keep advancing. That is how you escort a pawn to promotion.
1. Kd4  Kc6  2. Ke5  Kd7  3. Kd5  Kc7  4. Ke6  Kc6  5. d4  Kc7
          6. d5  Kd8  7. Kd6  Ke8  8. Kc7  Ke7  9. d6+  Ke8  10. d7+  Ke7
          11. d8=Q+
          1–0
Black to play
Opposition defends just as well as it attacks. By moving straight back each time the pawn advances, the defending king holds the opposition, blocks the pawn’s path, and draws. It is especially effective with a flank pawn, where the king can reach the corner and be stalemated.
1… Ke5  2. d4+  Kd5  3. Kd3  Kd6  4. Ke4  Ke6  5. d5+  Kd6  6. Kd4
          6… Kd7  7. Kc5  Kc7  8. d6+  Kd7  9. Kd5  Kd8  10. Ke6  Ke8  11. d7+
          11… Kd8  12. Kd6
          1/2–1/2
The crooked path
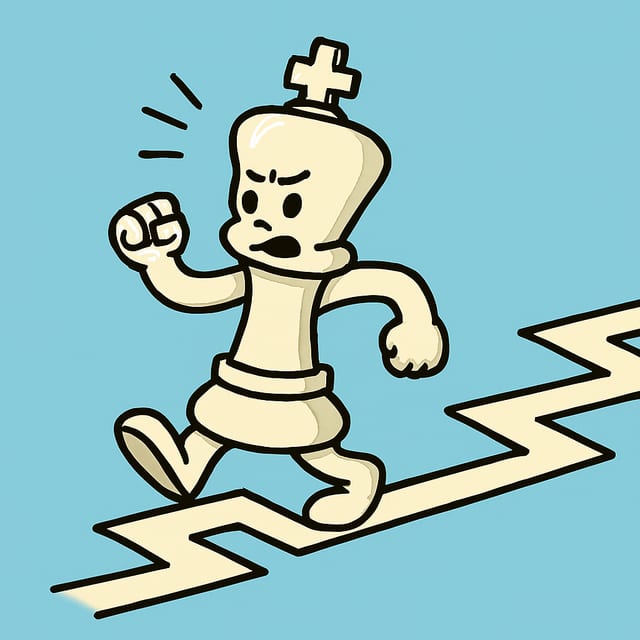
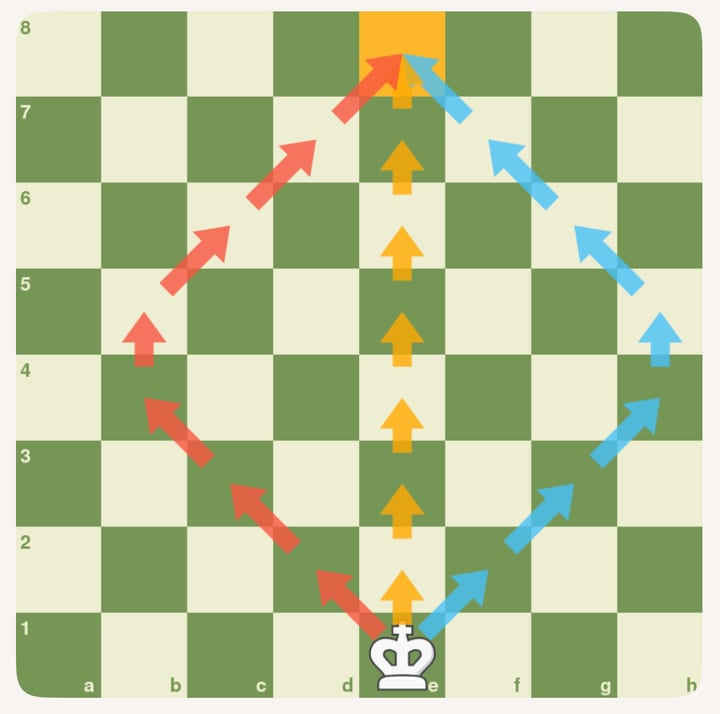
The crooked path is useful when you are walking your king towards a pawn or an important square. Unlike moving in a straight line, a zigzag lets your king influence more squares on the way and control where the other king can go.
If your king takes a zigzag route towards a pawn it can cut off the opposing king, force it to waste moves, and gain a crucial tempo. It is also how you stop your own king being trapped, or your pawn being stopped.
Notice that every route from e1 to e8 below is only seven moves. The straight one and the crooked one cost exactly the same — the crooked one just does more on the way.
In the first example White goes straight at the black pawn. Black has just enough time, and saves the draw.
1. Ke7  Kc3  2. Kd7  Kd4  3. Kc7  Kc5  4. Kb7  Kd6  5. Kxa7  Kc7
          6. Ka8  Kc8  7. a7  Kc7
          1/2–1/2
The same seven moves taken crookedly block the black king and force it to step aside. White gains the tempo, and wins.
1. Ke6  Kc3  2. Kd5  Kb4  3. Kc6  Kc4  4. Kb7  Kc5  5. Kxa7  Kc6
          6. Kb8  Kb6  7. a7  Kc6
          1–0
A queening race
When both sides can queen a pawn on their next move, it matters enormously that whoever queens first stops the other one doing the same. This shows how — but only if the opposing pawn is on the knight, king or queen files. On the others a draw can be forced if it is played correctly.
1. g6
              White can win if Black’s pawn is on the b, d, e or g file. On the a, c, f or h files it can be a draw if Black plays it correctly.
          1… b4  2. g7  b3  3. g8=Q  b2
              White has queened first, and now has to stop Black doing the same.
          4. Qg6+  Kc1  5. Qc6+  Kd2
              The idea is to force the black king in front of its own pawn.
          6. Qd5+  Kc1  7. Qc4+  Kd2  8. Qb3  Kc1  9. Qc3+  Kb1
              Now the white king can march up the board to help.
          10. Kg5  Ka2  11. Qa5+  Kb3  12. Qb5+  Ka2  13. Qa4+  Kb1  14. Kf4
          14… Kc1  15. Qc4+  Kd2  16. Qb3  Kc1  17. Qc3+  Kb1  18. Ke3
              Once more.
          18… Ka2  19. Qa5+  Kb3  20. Qb5+  Ka2  21. Qa4+  Kb1
              Careful — not d2, which is stalemate.
          22. Kd3  Kc1
              The only move, and mate follows.
          23. Qc2#
          1–0
King and rook against a lone king
Last week we went through checkmate with king and queen. This is the same job with a rook, and it is worth knowing properly, because it comes up again and again.
The idea is to drive the enemy king to the edge of the board and keep it there. Two things to hold on to: keep your own king supporting the rook, and only check when the two kings are directly facing each other. If the enemy king gets close to your rook, move the rook far away along its line.
1… Rg6
              The object is to drive the White King to the edge of the board
          2. Kf5
              If the King gets too close to the Rook, move it as far away as possible
          2… Ra6  3. Ke5  Kd7
              Keep the Black King supporting the Rook
          4. Kd5
              As soon as White’s King moves directly in front of the Black king, Check with the Rook and the White King has to retreat
          4… Ra5+  5. Kd4  Ke6
              Bring the King up but NOT directly in front of the opposing King, wait till he does that
          6. Kc4  Kd6
              Track the King across the board, when the White King gets near the Rook, move it far away
          7. Kb4  Rh5  8. Kc4
              This is where you need to be alert, Black to move, you do not want to put your King opposite White’s King, so we make a waiting move — just move the Rook one square
          8… Rg5  9. Kd4
              Now with Kings Opposite, check with the Rook and the White King is driven back
          9… Rg4+  10. Ke3  Kd5
              Proceed with previous instructions
          11. Kf3  Ra4  12. Kg3  Ke5  13. Kh3  Kf5  14. Kg3
              waiting move now required
          14… Rb4  15. Kf3  Rb3+  16. Ke2  Kf4  17. Kd2  Ke4  18. Kc2  Rh3
          19. Kd2  Rg3  20. Kc2  Kd4
              Tracking the King across the board, never cross onto the same line as the Rook
          21. Kb2  Kc4  22. Ka2  Kb4  23. Kb1
              Now the King is on the edge of the board, keep him there
          23… Rg2  24. Kc1  Kb3  25. Kd1  Kc3  26. Ke1  Kd3  27. Kf1  Ra2
          28. Ke1  Rb2  29. Kd1  Rb1#
          0–1
Play it through one move at a time and watch the black king being squeezed into a smaller and smaller box. Notice move 8, the waiting move — the rook shuffles one square so that it is Black to move again, with the kings still opposite.
Draws and stalemate
This one is not about wins or losses, but draws. There are a few ways a game can end in one:
- Insufficient material — not enough pieces left to mate with, such as king and bishop against king, or king and knight against king.
- By agreement — you or your opponent offers a draw and it is accepted.
- Threefold repetition — if the same position occurs three times in a game, a player can claim a draw.
- The fifty-move rule — if no pawn has moved and no piece has been captured in fifty moves by each player, the game is drawn.
- Stalemate — it is a draw when the player to move is not in check but cannot move without moving into check.
- Perpetual check — repeating the same check over at least three times.
Two stalemates worth avoiding
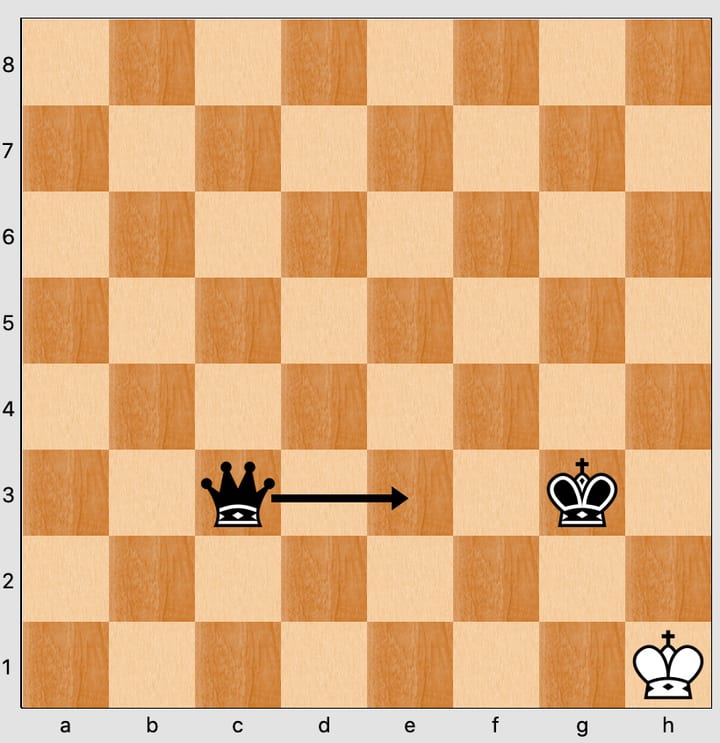
If Black moves the queen to e3 — not even giving check — the white king has nowhere to go. Stalemate, and a draw from a winning position.
And here, if White leaves the queen on f7 and walks the king closer, the black king has nowhere to go either. To avoid it, keep the queen on the seventh rank but further away — e7, d7, c7.
Perpetual check
White is ready to mate the black king. Black’s queen forces the draw anyway by checking, and checking, and checking — White has no way to escape it.
1… Qf1+  2. Kh2  Qf2+  3. Kh1  Qf1+  4. Kh2  Qf2+  5. Kh1  Qf1+
          1/2–1/2
Next: Getting started covers the rules these endings assume you know, and Blunders and dangerous squares is about not throwing the game away before you reach one.