Tactics
Openings get you a decent position. Tactics are how games are actually won from there — and most of them come down to noticing something your opponent has left loose.
Checks, Captures and Targets
If you keep losing games by making the same mistakes over and over, the fix is not a new opening. Put one or two pawns in the centre and protect them, develop your knights and bishops before the queen and rooks, and castle early to get the king safe and a rook into play. That alone will hand you a reasonable middle game.
The middle game is where you look for and carry out tactics — pins, forks, skewers, discovered attacks — so you need those ideas in your head the whole time.
When it is your move, sit on your hands. Do not touch a piece. Look carefully at what your opponent has just played, and only then decide. This is where CCT comes in, and it is three questions in the same order every time.
Checks — is there any way I can check the king? Start here, because a check is forcing: your opponent has to answer it and cannot get on with their own plan.
Captures — are there any pieces I can take? Every one of them, not just the obvious one. Count what defends the square before you take.
Targets — what is weak or unprotected in my opponent’s position? Anything undefended, anything defended only once, anything that cannot easily move. Then plan an attack on it.
Puzzle time
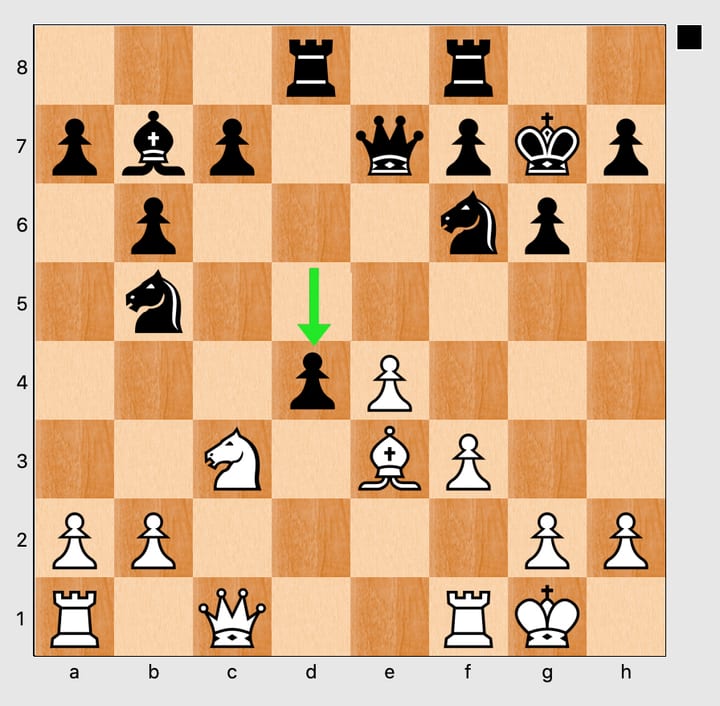
White has a way out, and it takes no more than four moves. Work through the three questions in order and say for each move whether it is a check, a capture or a target.
Use this system and your game will improve very quickly.
Pins
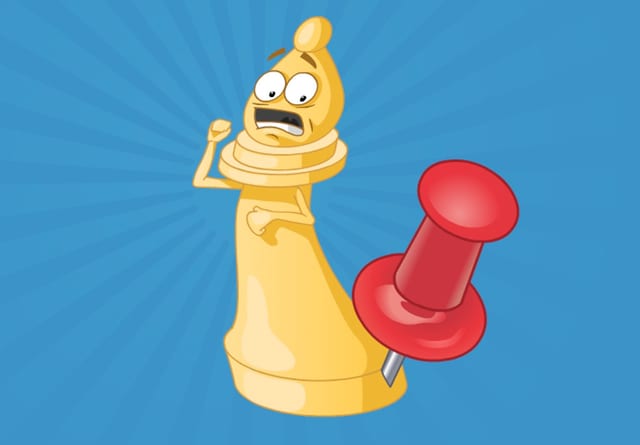
A pin is when one piece restricts the movement of an opponent’s piece, because moving it would expose a more valuable piece behind it to capture.
Only the long range pieces can pin — the queen, rooks and bishops. Pins happen on ranks, files and diagonals. There are two kinds:
- Absolute pins. The piece is pinned against the king and cannot move at all, because that would leave the king in check, which is illegal.
- Relative pins. The piece is pinned against something valuable like the queen. Moving it is legal, but usually a bad idea, because it loses material.
Both are on the board at once here. The white bishop on b5 has an absolute pin on the knight on c6 — that knight has no legal move whatsoever. The black bishop on g4 has a relative pin on the knight on f3, which may move but would drop the queen if it did.
Using a pin to win material
The simplest kind. The black rook on e8 pins the white knight on e4, and behind it the white rook on e1 has nothing defending it. The knight can legally move — but if it does, the rook goes.
More is going on here. Black’s queen pins the rook on f2 against the king on g1, but a queen is worth a great deal more than a rook, so taking is a poor bargain. With Black to move: queen takes queen, bishop takes queen.
Now the queens are off, and the pin on f2 is still there for the taking.
The bishop steps to d4 and pins the rook against the king, which is a much better exchange than the one Black turned down.
Remember that you do not have to take a pinned piece. If leaving it there causes your opponent problems, leave it — as long as it is safe to do so. Better still, attack a pinned piece again, with a pawn or another piece.
Being able to spot pin patterns, and knowing how to use them, is one of the most useful skills you can build. King and rook checkmating technique is on the endgames page, alongside the king and queen method.
Skewers
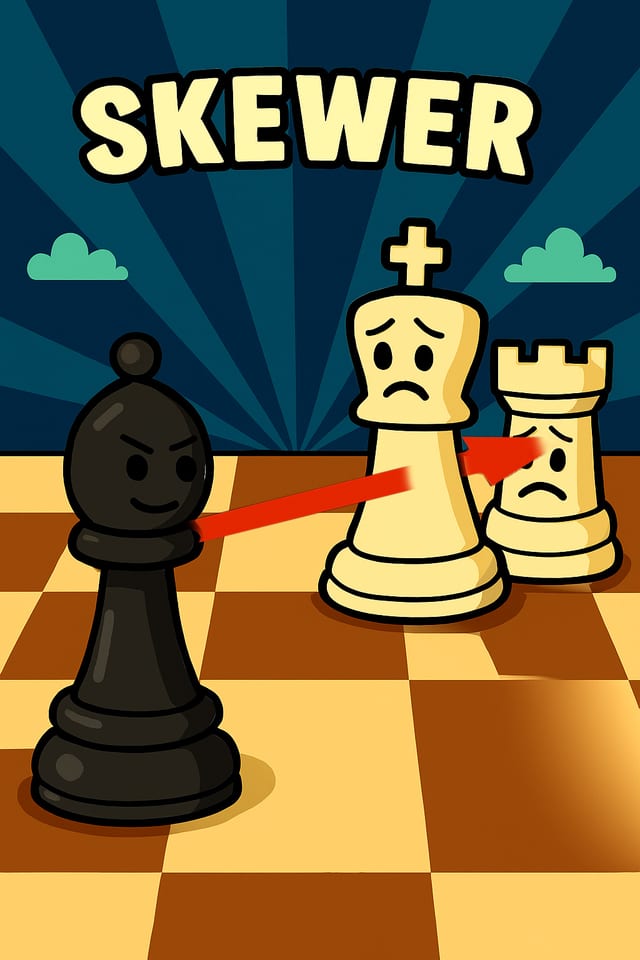
During the lesson on the pin it was said that a skewer is a reversed pin. Here is what that means. In a skewer, the more important piece is in front of the attack and the lesser piece is behind it.
White plays rook to e1, check. The king has to move out of the way, and the rook takes the queen — which should be an easy win from there.
Turn the two black pieces round and it is a pin instead. If White plays rook to e1 the queen cannot step aside, because she is pinned, so she is forced to take the rook with check. If the king takes the queen, the game is a draw. If the queen does not take, White wins her.
The bishop on e2, worth three points, steps to d3 and skewers both rooks, worth five points each — winning at least one of them.
As long as the attacking piece is worth less than its target, it is a good skewer.
Puzzle time
Four to try. Cover the answer underneath each one first.
Answer: bishop to g2, check. The king and the rook are on the same long diagonal, so wherever the king steps — and it has six squares — the bishop takes the rook on a8.
Answer: bishop to c4. It attacks the queen on d3 with the rook on f1 directly behind her. If the queen takes the bishop, the pawn on b5 takes the queen; if she moves away, the bishop takes the rook. Either way Black comes out well ahead.
Answer: queen to f1, check. The king on c4 and the queen on a6 share a diagonal, and the white queen arrives at the end of it. Every king move loses the queen.
This one is harder, and it is worth knowing that we could not find a skewer here that works by force. The bishop can come to c4 and pin the bishop on e6 against the king on f7, which is the strongest try, but Black holds on.
If you find something better, bring it along on a Saturday — we would like to see it.
Removing the guard
This one is sometimes called removing the defender. You force a piece that is guarding something — another piece, or an important square — to move or be taken. Once the guard has gone, whatever it was protecting is there for the taking.
White’s queen would love to take the rook on c7, but the black queen is defending it. So White plays knight takes e6, forking the two rooks. The queen takes the knight — and in doing so she stops defending c7. Queen takes rook.
Another one. Black has just played knight to d4, attacking the knight on e2 and the pawn on b3 at the same time. The black king is the only thing defending that knight, so White makes the king move:
1. b4+ axb4 2. axb4+ and now the king must take on b4, or go to b5 or d6 — whichever it chooses, it stops defending d4 — 3. Nxd4.
The French Defence lines that were on the old version of this page have moved to Opening lines, where the rest of the openings live.
That tricky knight
It is amazing how many players the knight catches out, forking pieces and jumping about with gay abandon. So here are a few things to watch for.
A knight on a dark square always jumps to a light one, and the other way round. That is nothing new. What is worth noticing is which of your opponent’s pieces are sitting on the same colour square as your knight, because those are the ones it can reach.
The white knight is eyeing c7, where it would fork the king and the rook — but the black queen is covering that square. So try removing the guard: bishop to d5, threatening b7.
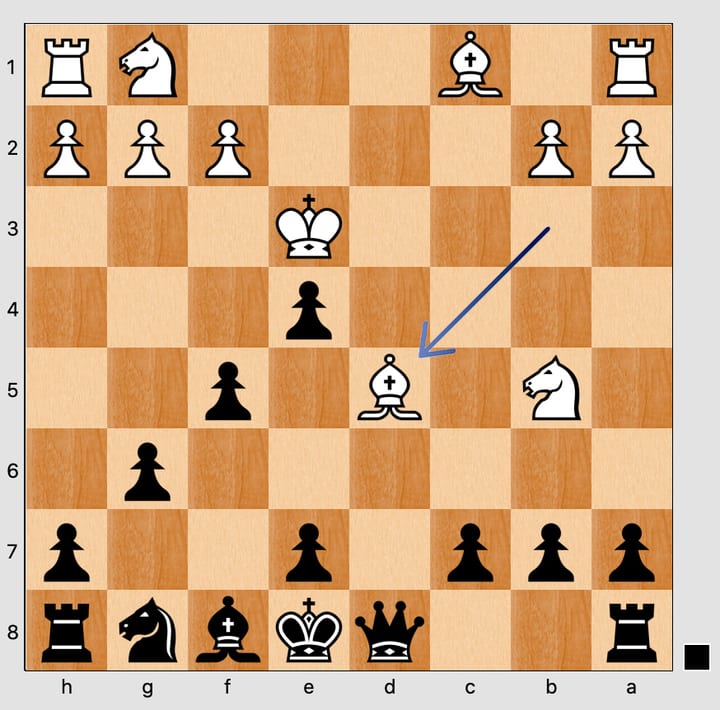
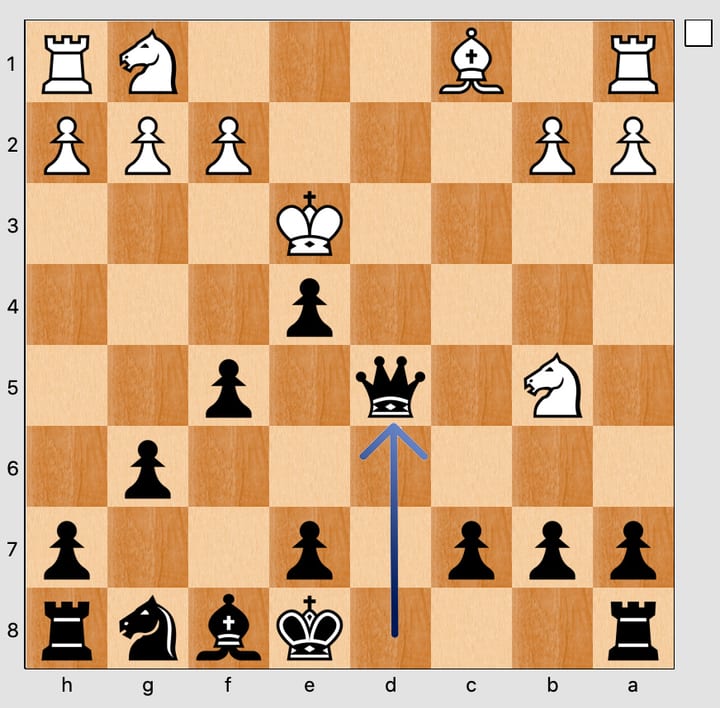
The queen takes the bishop — and now count how many of Black’s pieces are sitting on the same colour square as White’s knight.
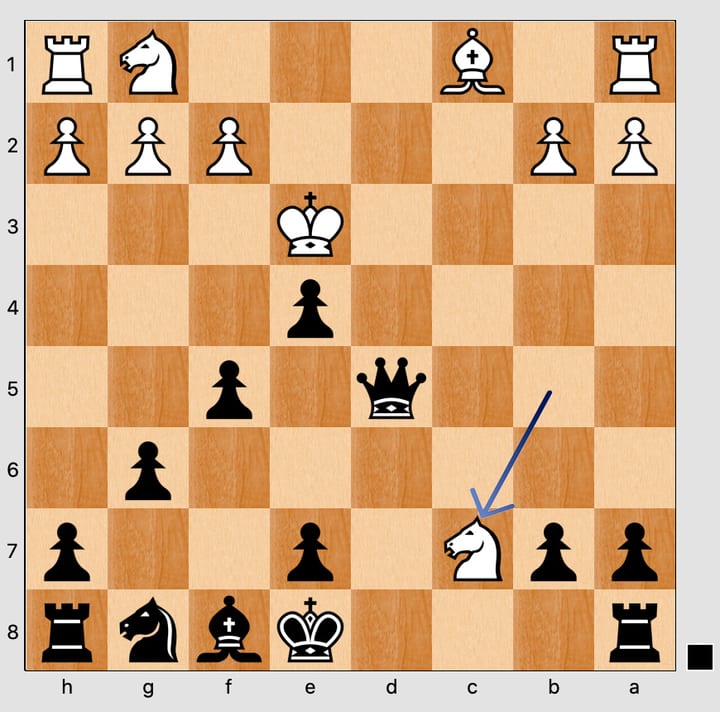
Knight check shadow
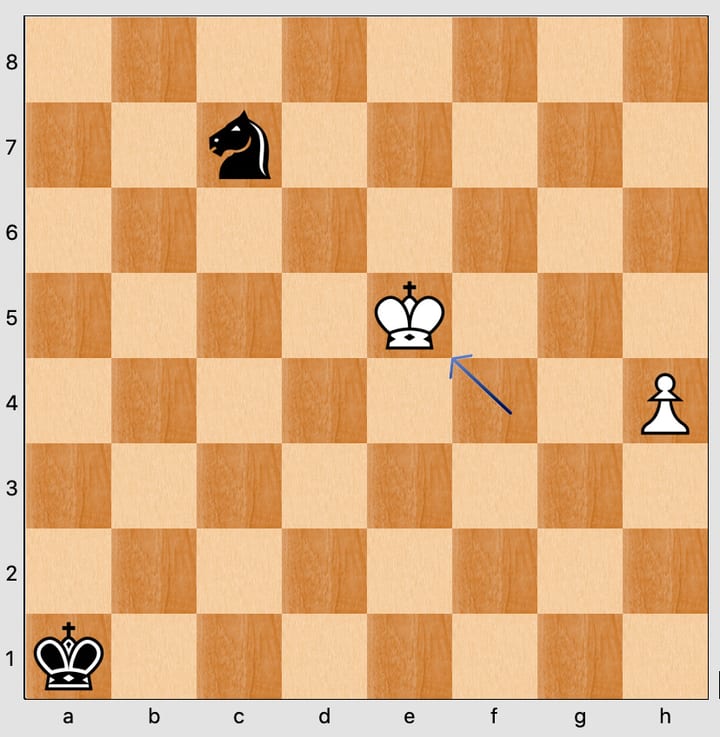
Karpov’s distance
Anatoly Karpov is a Russian and former Soviet grandmaster and former World Champion, and he played this so often it took his name. The king comes close to the knight, but stops on a square the knight cannot reach in one jump. If the knight moves, it lands in the check shadow — or gets taken.
The kingside attack
The kingside attack is attractive because it involves combination play, sacrifices and surprise moves, all aimed at a quick checkmate. The question is when and how to start one.
First, look at a typical castled position, where the king is protected by three pawns and a knight.
While those defenders stay where they are, the king is fairly safe. As soon as the formation changes — the h pawn advances, or the g pawn, or the knight leaves — the king becomes vulnerable.
In the game below, White plays h3 on move 9 to prevent a pin. That pawn then becomes exactly the target Teichmann aims at, and he gives up a bishop to break the defence open. Play it through one move at a time.
1. e4  e5
              Excellent opening moves, pawns in the centre, open lines for Queen and Bishop
          2. Nf3  Nc6  3. Bc4  Bc5  4. c3
              both sides develop minor pieces, c3 setting up central control
          4… Qe7  5. O-O  d6  6. d4
              supports e pawn and Bishop also allows c8 Bishop into the game
          6… Bb6  7. a4
              White threatens a5 to trap the Bishop
          7… a6
              a retreat square for the Bishop
          8. a5  Ba7  9. h3  Nf6
              Black now ready to castle
          10. dxe5
              time to open up the centre
          10… Nxe5  11. Nxe5  Qxe5  12. Nd2
              defending e4 and developing
          12… Bxh3
              a Bishop sacrifice to make way for Black’s Queen and Knight
          13. gxh3  Qg3+
              the f pawn is pinned, the Queen attacks
          14. Kh1  Qxh3+  15. Kg1  Ng4
              the knight comes galloping in threatening mate on h2
          16. Nf3
              stopping the mate on h2
          16… Qg3+  17. Kh1  Bxf2
              Black’s threat is 18...Qh3+ 19.Nh2 Qxh2 mate, and if 18.Rxf2 then Nxf2 mate
          0–1
Five middle game ideas
Tactics come from good positions. These five ideas are the ones that most often create the loose piece or the open line that a tactic needs.
A battery
A battery is two pieces that move the same way lined up on one file or one diagonal, one behind the other: two rooks on a file, or a queen and a bishop on a diagonal. Neither piece is worth any more than it was, but together they hit a square twice, and a square attacked twice is hard to defend twice for long. Build the battery before you need it. Then the threat takes one move instead of three.
A pawn break
Once both sides have finished developing, positions often lock up and nothing can get through. A pawn break is a pawn push played on purpose to open a line — you offer a trade so that a file or a diagonal comes open. The break to choose is the one that opens a line your pieces are already looking down. Play it before they are ready and you have opened the line for your opponent instead.
Trading a weak piece for a strong one
A knight and a bishop are both worth three points, but three points is only a starting guess. A knight on the edge of the board with nowhere to go is worth less than a bishop cutting across the whole board; a bishop shut in behind its own pawns is worth less than a knight sitting in the middle. When you can trade a piece with no future for one that has one, take the trade. The scoresheet will say the material is level and the position will say otherwise.
Creating weak pawns
Pawns cannot move backwards, so a pawn weakness does not go away. Three to know:
- Doubled pawns — two of yours on the same file. They cannot defend each other, which is the job pawns are best at.
- An isolated pawn — no friendly pawn on either neighbouring file. It has to be defended by pieces, and those pieces are then tied to it.
- A backward pawn — left behind by its neighbours, unable to advance safely, and easy to sit in front of.
If a trade would leave your opponent with one of these, it is often worth making even when the material comes out level.
A knight outpost
An outpost is a square in your opponent’s half that none of their pawns can ever attack, because the pawns that would have done it have already gone past or been traded off. A knight parked on an outpost is a nuisance for the rest of the game: no pawn can chase it away, so removing it costs a whole piece. Look for these squares in front of a backward or isolated pawn — that is usually where they are.
The windmill
The windmill is in fact a series of discovered attacks, and it is great fun to watch. The example is from Carlos Torre against Emanuel Lasker, Moscow 1925. White gives up the queen, and then the rook checks and steps aside, checks and steps aside, taking something every time it comes back.
1. Bf6  Qxh5  2. Rxg7+  Kh8  3. Rxf7+  Kg8  4. Rg7+  Kh8  5. Rxb7+
          5… Kg8  6. Rg7+  Kh8  7. Rg5+  Kh7  8. Rxh5
          1–0
Pawn storming
When the two kings have castled on opposite sides of the board, you can push the pawns in front of your opponent’s king without loosening your own. That is what makes a pawn storm possible at all.
Push them up together rather than one at a time, and keep hold of what the pushing is for: you are trying to prise open a file so that a rook can come down it. A storm that wins a pawn but opens nothing has not really got anywhere. Put the rook on the file before it opens, so that the moment it does, the rook is already there.
And because your king is on the far side, your opponent is very likely doing the same thing back. It is a race, so a move spent on anything else is a move given away.